Dry Hopping

March 21, 2012

I’ve just produced my first dry hopped beer, but what is dry hopping and why do it?

Dry hopping is the addition of hops to fermenting beer after it has cooled.  Hops are used in two primary roles – to add bitterness and to add aromatic flavour.  Bitterness comes from boiling hops: this converts alpha acid to iso-alpha acid, which we perceive as bitterness.  The longer you boil the better the conversion and the more bitterness you get from a given quantity of hops.  For this reason bittering hops go in at the beginning of the boil.  Hops also contain other compounds which contribute to aroma and flavour.  The boiling process drives off these volatile compounds, so boiling is always a trade off between bitterness and aroma.  For this reason hops for tasty floral notes go in right at the end of the boil.  Using the counter-flow chiller also helps lock in this flavour.

But no matter how late the hops go in there is always a loss.  Also the action of fermentation also drives off delicate hoppy notes – the escaping CO2 takes with it hop character.  So the solution is dry hopping (well, one of the solutions).

I brewed up an India Pale Ale with a bitterness of 56IBU.  I fermented this out until the primary fermentation had ended.  I transferred the beer from one fermenter to another, thereby removing the beer from the yeast sediment.  I purged the headspace of the new fermenter with CO2 and bunged on a fresh airlock.  Standard stuff.

I weighed out 25g of Cascade hops and placed them in a homemade pantyhose hop-sock.  To stop the sock from floating I threw a stainless steel teaspoon into it too.  I knotted the end and in the fermenter it went.

Hopsock before…

And after…

I left the beer at fermentation temperature (18C) for another 7 days, then turned the fridge down to 7C for another 2 or so.  This caused any remaining yeast to floc out and stick to the bottom of the fermenter.  Out came the beer and into a keg.

What are the results like?  Pretty bloody encouraging!  Very aromatic and quite floral.  There is very little grassy taste (which I was worried about with using this method).  The beer wasn’t fully cold or gassed at the time, so I’m reticent to call the verdict just yet – but I’m pretty pumped about this one!

And, finally, the pantyhose hop-sock did a wonderful job at containing the pellet hops, with no detectable bits of hops making it into the beer.


DIY Rock Climbing Holds

March 16, 2012

A friend, John, had just built himself a bouldering wall in his garage to train on and keep his fitness up.  He scored a box of secondhand climbing holds from an indoor climbing gym.  Although they were used, they were still fairly expensive.  So we set about making our own using the ones he had as templates.

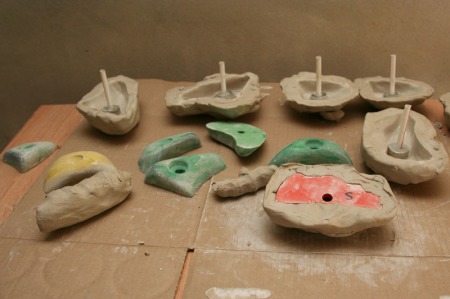
The first step is to make a mold from an existing hold.  There are two approaches, both with their pros and cons.  The ‘correct’ way is to use mold-making silicone.  This provides a flexible and reusable mold, but silicone is expensive.  The approach we went with was to use clay.  The drawback with this method being that you destroy the mold every time you use it.

Carefully remove the existing hold once the impression is made.  Next roll some clay to make the recess for the bolt head to sit in, place it in the mold and put a washer on top.  To form the tube where the bolt will eventually sit I used McDonalds drinking straws.

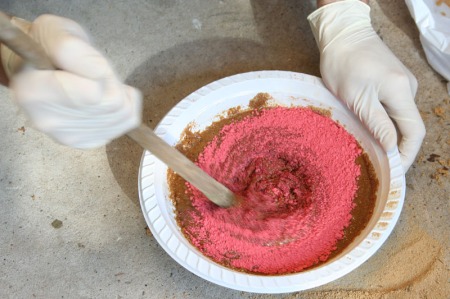
Next it’s time to mix up the resin.  This is made from polyester resin, sand and coloured with powder paint (you know, the stuff that children paint posters with).

This then gets poured into the clay molds.  Here I found another drawback of clay: it’s full of moisture which is slowly evaporating. This cools the epoxy and can make curing times very long (24hrs). If you make a mold out of silicon or thermoplastic then you can heat your holds as they cure (I used a cardboard box and a fan heater when using a non-clay mold) and you can punch out a batch of fully cured holds in 1hr! Clay is excellent for a proof of concept, but you’d want to find a better method to fill a whole bouldering area.

Once the holds are fully cured they can be stripped out of their molds.  These holds are very strong, but can be brittle so it’s very important that before you tighten them to the wall of your bouldering area that the backs of them are perfectly flat.  No matter how carefully you pour them you will not get them totally flat and this seemed like it might be quite a challenging process to flatten them after curing.  But John came up with a wonderfully simple solution – rub them on an abrasive flat surface… like a road!

And when they’re done they look just like the one below.  They’re just like the ones you’re used to using in the gym and exceptionally cheap to make!  And if you take an impression of all your holds, you double your collection every time you do a pour.


Pedal Board

March 16, 2012

Again, this one fits into the category of things that I’ve had for a while but should probably get a run on the blog…

I’ve been noodling about with guitar for a couple of years now.  I began because I had a stressful, life-encompassing job at the time and thought it might be a good idea to have a challenge to provide a bit of escapism.  I am by no means a great guitarist, and probably not even a good one – but I can’t help but think that it’s healthy to not always fill your life with things you’re instantly good at.  And as someone that never played as a child, I find it fascinating to be involved in producing music no matter how limited.

Now the sight of a well-stocked pedal board in the hands of a novice probably makes a whole bunch of armchair Hendrixes (Hendrices?) roll their eyes smugly, but I have to point out that this particular board is as much a product of the enjoyment of collecting and making, as much as it is mindless Gear Acquisition Syndrome.  All of these effects are second hand and I thoroughly enjoyed tracking them on ebay and only pouncing when one came up at a mind-bogglingly low price.  Every now and then something just fails to get noticed and limps in for the reserve price – and I lived for that moment (behind my desk in a shitty cubicle-farm…)

So a quick rundown of the effects platoon… Behringer TU300 Chromatic Tuner, Boss AC3 Acoustic Simulator, Boss AW2 Auto Wah, ElectroHarmonix Small Stone phaser, Behringer CS100 Compressor/Sustainer, Behringer TO800 Vintage Tube Overdrive, ProCo Turbo Rat distortion, Boss DS1 Distortion, Boss CH1 Super Chorus, Boss BF2 Flanger, ElectroHarmonix Stereo Pulsar tremolo, Behringer DD400 Digital Delay, Boss RC2 Loop Station.  A couple of these, apparently, are even collectible – many are no longer in production and the BF2, for example, has the correct colour screws to make it a suitably collectible Made In Japan model.

I made the pedal board itself out of MDF and built up laminations so that the pedals in the rear are accessible and at an appropriate height.  The pedals are held in place with individual sections of chain link (which are essentially a dog-bone shaped tab with a hole at either end).  I have a switchmode power supply to provide the 9V DC required by each pedal, and the loom distributes it taking careful note of the polarities required by each effect (which are not always consistent).

All in all, I’m pretty pleased to have such a thing.  It slides nicely out the way under my bed, only requires three things to be plugged in for a jam sesh (power, guitar in, signal out) and certainly provides a wide range of tones to suit most music styles.  Has it made me an instant guitar-hero?  No, but then that was hardly the point…


Mango

March 16, 2012

Another addition to what is beginning to look convincingly like a small orchard is the mango.  It’s into its second year, although I still declare it one year old because I essentially neglected it for a full year and it responded with absolutely no growth whatsoever.

I grew this plant from seed from a mango that I collected from a friend’s garden in Drummoyne.  Growing mangoes from seed is actually a pretty cool process.  You cut the flesh away (and eat it!), let the stone dry a little for two days or so such that the remaining flesh isn’t all slimey.  Next grab a pair of garden secateurs and cut around the convex edge of the stone.  Fold it open like an oyster and inside is a fleshy embryo.  This goes vertically into some soil and a couple of weeks later you have a mango plant!

Some mangoes can only be grown by cutting, and this was one of the motivations to find an old established suburban tree to use as the source of my stone rather than using a store-bought mango.  I figure that the modern commercial mangoes are far more likely to be of the sort that cannot be propagated traditionally.  Whether or not my mango will bear fruit is a good question, and only one that time will answer.

Another interesting episode in the life of the mango was a couple of months ago when it got what I imagine was a fungal infection.  All the leaves went completely black and shrivelled up before dropping off.  The mango was simply a stick and I thought “well bugger that, it’s dead”.  I was too lazy to do anything about it when it was looking sick, and equally I didn’t do anything once I thought it dead – so I left it there as a dessicated monument to poor gardening.  But then a few weeks later it sprouted a thick crop of new, healthier leaves!  Go evolutionarily advantageous immune responses!  Obviously denuded of its habitat whatever was causing the issue also disappeared.


Fig

March 16, 2012

This fig came to me essentially as a rescue plant.  It was originally a cutting from Mary’s father’s fig – but had fallen over in its pot, had all its roots exposed, dried out completely so that the soil had shrunk away from the pot and generally been neglected.  But it wasn’t dead – and I figure I’ve got a hardy plant on my hands!

I repotted it to a larger pot with new mix, staked it upright and it’s been getting regular waterings.  I’ve only had it for a few weeks and already it has plenty of fresh growth.  Now all it needs to do is repay the kindness with a bountiful crop of tasty figs and I think we’ll be even.