Singapore Noodles

September 28, 2012

Another in the Formula 1 Food series (albeit not actually Singaporean)…

Ingredients

  • 300g peeled green prawns
  • 300g chicken breast, diced
  • 1tbsp rice wine
  • 2tbsp light soy sauce
  • 1tbsp finely diced ginger
  • 250g rice vermicelli noodles, steeped in boiling water until soft
  • 1tbsp curry powder
  • 1 capsicum (red or green)
  • 3 spring onions

Directions

  1. Marinate the chicken and prawns in the rice wine, soy sauce and half the ginger.
  2. Fry the chicken until cooked.
  3. Add the capsicum, spring onions, remaining ginger and curry powder.  Fry until capsicum has softened.
  4. Add the prawns and remaining marinade.  Cover and steam for a couple of minutes until prawns are cooked.
  5. Remove from heat and stir through the noodles.

RaspBMC: mapping Samsung remote

September 22, 2012

One of the great features of RaspBMC is the ability to control it using your existing TV remote when connected via HDMI.  It accomplishes this task by making use of CEC to pass control codes from the TV to the Raspberry Pi.

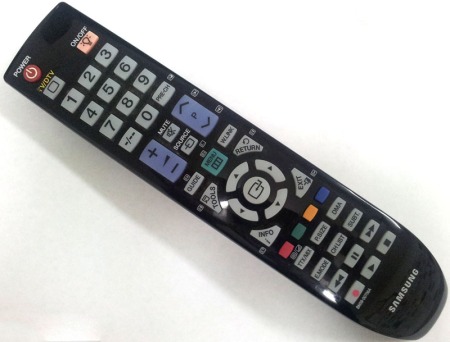
While most of the important buttons on my Samsung TV pass happily through to XMBC (such as navigation arrows, play, pause, stop, etc) one of the controls which is sorely missing is the ability to access the context menu.  Which means that every time I need to alter a setting I need to plug in a usb keyboard.  I would also like to be able to adjust the XBMC volume using the remote.

Thankfully XMBC is designed in such a way that you can set up your own custom keymaps to alter the behaviour of the existing remote buttons or add new ones.

The first step is to work out which of the buttons on your remote actually get passed through to the Raspi.  Not all buttons on a remote are CEC enabled, which seems to be at the whim of the TV manufacturer as is the name that each button appears as.  My volume buttons are not enabled so I want to remap Channel Up/Down to perform this function when video is playing.

If we connect to Raspi via SSH (using a terminal program such as putty) then we examine the status updates recorded in xbmc.log in response to each key press…

tail -F /home/pi/.xbmc/temp/xbmc.log

This then shows the name of each button (in this case I pressed the ‘green’ button).  The response was to bring up the Videos screen.

22:00:43 T:1182790720   DEBUG: CecLogMessage – key pressed: F3 (green) (73)
22:00:43 T:1182790720   DEBUG: PushCecKeypress – received key fc duration 0
22:00:43 T:1102835712   DEBUG: OnKey: 252 (fc) pressed, action is XBMC.ActivateWindow(MyVideos)

(You may find that key presses are not being logged.  If this is the case then you need to create /home/pi/.xbmc/userdata/advancedsettings.xml and add the lines <advancedsettings> <loglevel>1</loglevel> </advancedsettings>)

Then the final step is to make an entry in /home/pi/.xbmc/userdata/keymaps/remote.xml to bind the key to a new action (such as XBMC.ActivateWindow(VideoLibrary,MovieTitles).  The list of actions can be found the XBMC wiki (ButtonTranslator.cpp).

However things get more complicated with my Samsung remote because many of the buttons do not come up with their actual name…

12:10:10 T:1183839296   DEBUG: CecLogMessage – key pressed: channel up (30)
12:10:10 T:1183839296   DEBUG: PushCecKeypress – received key d2 duration 0
12:10:10 T:1075412992   DEBUG: OnKey: leftshift (d2) pressed, action is PageUp

Above is what happens when I press the Channel Up button.  From the above log you would expect this to respond to something like a <channel up> or <d2> tag.  But it doesn’t.  The tag you want is inexplicably <pageplus>.  The way I found this out was that this button already had a behaviour associated with it in /opt/xbmc-bcm/xbmc-bin/share/xmbc/system/keymaps/remote.xml, so I could trace it back.  However there are buttons on the remote that do pass CEC codes through but aren’t already defined with a behaviour and it seems at this point in time I have no way of finding out what their tag should be!

This is a real pain, because of all the buttons that pass through CEC only half of mine I can work out the correct tag for.  Grr!

So anyway my volume fix ends up looking something like this…

<keymap>
  <global>
  </global>
  <FullScreenVideo>
    <remote>
      <pageplus>volumeup</pageplus>
      <pageminus>volumedown</pageminus>
    </remote>
  </FullScreenVideo>
</keymap>

UPDATE: work-in-progress listing of codes


How to salt air-popped popcorn

September 21, 2012

Earlier in the week I had a go at making my own microwave popcorn using a brown paper lunch bag.  At the time I mentioned that this technique, while costing well less than 10c a bag, does suffer from one of the key problems of all dry-popped popcorn (such as that made in an air-popper) which is difficulty getting seasoning to stick to the corn.  When cinemas use butter flavouring this goes in with the oil and they use a highly milled salt.  Standard table salt sprinkled over air-popped corn simply falls off.

I’m not entirely sure where you would go to find finely milled salt.  They use it on potato chips, for a similar reason – ease of adherence.  All I know is that it won’t be in your average supermarket aisle.

Not that any of this matters because it turns out that it’s really straightforward to make your own.  A mortar and pestle makes very short work of it all.  I was able to make a couple of teaspoons of fine salt powder in less than a minute of grinding.  (the granite mortar and pestle was $15 for those keeping an eye on costs!  and your curries will thank you for ever more…)

It sticks to popcorn wonderfully well.  Having done this I am honestly baffled at how many endless forums threads there are on how to get flavouring to stick to dry corn.  Everything from oil sprays to specialist chemical suppliers are mentioned – yet this is actually the easiest problem to solve ever!  And you don’t get soggy, oily corn.


Replacing Honda Civic passenger door lock

September 21, 2012

I never got around to writing this one up at the time (perhaps hoping to forget the whole incident!), but you know this is the sort of information that really can benefit someone else…

A while back my car, a 1998 3-door Honda Civic was broken into.  I had the misfortune of meeting the thief while he was still inside my car in the middle of stealing it.  But that’s a story for another day.

He had gained entry via the passenger door.  He’d taken a screwdriver and destroyed the lock barrel.  He then pried whole handle out of the door skin to actuate the rods behind it.  Essentially both the door handle assembly and the lock were completely destroyed.  And the problem that I faced was that until I fixed it my car was openable by anyone who could spot the damage.

I did some ringing around and was not pleased with the news: Honda wanted in excess of $1000 to rebarrel the entire car and even a wrecker’s yard wanted $350 for a new handle and lock.  I couldn’t believe what I was hearing – $350 for a handle from a trashed car that won’t even have a matching key!  And I certainly wasn’t going to pony up over a grand for a car that’s only worth four.

Having a look on the net I noted that the US spares market is not only significantly cheaper, but also unlike here in Australia where you have to ring everyone and inspire them to dig around out that back, the Americans have all their stock either placed on their website (complete with individual photographs) or thrown up on Ebay.  Sure, I would be looking at a fair bit of postage, but even all that combined I would still have plenty of change from a $100 note (fully delivered to my door, no 2hr journeys to the middle of nowhere to find parts).

But I still wasn’t thrilled about not having a matching key.  I figured that instead of carrying two keys I would just treat it like it didn’t have a lock (ie not externally unlockable).  Wait a minute, I thought, what if I could fit a handle with no lock at all?  So I started peering at rear passenger door handles for 4-door Civics in my year.  They looked remarkably similar and worth having a punt – so I ordered one for $35 (+40&pp).

…and so the whole purpose of this post: they are entirely interchangeable.  I needed to take off the interior door card for the passenger door and unbolt the broken handle assembly.  The rod which connects the lock cylinder to the door latch is permanently removed (so no-one else can just stick their hand in there and tug it open, and also to prevent rattling or it all getting tangled).  Naturally, the other rods (from the handle to the latch and the latch to the interior handle all stay as is.  I have reproduced the appropriate page from the factory service manual, highlighting the rod to remove in red.

All in all this is about a 1hr job for the uninitiated, and having done it once I could probably do it again in half the time.  When I saw the break-in I thought I’d be up for a massive bill, but this turns out to be a really cheap thing to fix.  I’ll admit it takes a little bit of retraining to remember to open the door from the inside instead of from the kerb side.  It can be a little annoying when loading something through that door.  But it has never been $1000-worth of inconvenience.  And, as you can see below, no-one would ever know that this is possibly the only Civic without a passenger keyhole – it looks like it has always been that way.


DIY microwave popcorn

September 18, 2012

Everyone is aware that cinema popcorn is one of the most expensive substances known to man.  And so the supermarket shelves are stocked with microwave popcorn which, when compared with a $9 bucket at the movies, seem quite reasonable.  But are they really?  And you’d think from the way they’re marketed that there’s some sort of proprietary magic going on to be able to cook corn in a microwave rather than the purpose built commercial machines.  Or are they honestly just a bag full of corn?

Tonight I found out…

First I took 2 tablespoons of popcorn kernels and placed them inside a brown paper lunch bag.

I folded over the open end twice and secured it with a little tab of sticky tape.  The rationale here is that I want to contain the steam, but allow for some venting should the bag over-expand.

I placed the bag in my microwave and cooked it on high power for 90 seconds.  Popping began and the bag swelled satisfyingly.

And inside was perfectly cooked corn!  This technique delivers a popcorn which is identical to an air-popper (only you don’t have to buy an air-popper).  Unlike traditional microwave bags the corn isn’t greasy – which is an advantage for people that don’t like greasy corn, but can also mean that your regular table salt won’t stick very easily.  So if you like seasoned/flavoured corn you’d need to explore the solutions that people come up with for air-popped corn.  I think I might look into getting my hands on very fine milled salt (like used on potato chips) which will stick better than coarse table salt [EDIT: solution here!].

But yeah, at something like 10c a bag, you can’t really go wrong with DIY microwave popcorn!