Biscuit tin guitar: attaching body to neck

February 26, 2013

When Mary’s found-by-the-side-of-the-road guitar fell apart, I thought it time to give it a third lease on life.  I’ve seen a few people make oil-can banjos, so I thought I’d have a go at a biscuit tin guitar.

A tin does not have the structural rigidity to take the tension between either end of the guitar caused by tuning the strings up to pitch.  My solution was to lengthen the neck of the guitar by adding a wooden spine.  The tin would then float over this.

The other consideration is ‘scale length’.  This is the distance between the nut and the bridge of the guitar, and is important because it can vary from instrument to instrument and each of the frets has been specifically calculated as a subdivision of this overall length.  This should be measured before you hack up the donor guitar, but if that’s not available you can measure the distance from the nut to the 12th fret and double it.  Once you know the scale length (mine was 25.5″) then you can start thinking about what sort of size can you will need to allow for the right scale length and a little extra so the bridge isn’t right on the edge of the can.

The first step (after liberating the neck from the old guitar body) was to cut some lengths of wood for the new spine.  An L-shaped notch is made the length of the can so that the top surface (soundboard) of the can will not touch the spine underneath and therefore be free to vibrate.

tintar - spine

I then glued the three lengths together to build up the thickness.  I also radiused the front edge where the can meets the fretboard, because my can has a rounded end.

tintar - spine laminations

Next the spine is glued to the fretboard.  This connection is going to need to be able to take quite some stress so I epoxied it and added a couple of screws.

tintar - fretboard

Then the tin goes on.  A hole is needed on the front edge for the spine to slot through.  If it is cut in such a way that it creates flaps that fold in not only will those flaps centre the spine in the hole but a screw through one of those flaps will also hold it in place.  When you’re happy that the fretboard sits parallel to the surface of the soundboard screw the end of the spine to the end of the tin can.

tintar - tin mounting

Coming up… tail piece, bridge, strings, music!


LowBrau – Concept

February 6, 2013

I have been toying for some time with the idea of shrinking my brew rig.  Don’t get me wrong, it’s a fantastic setup and it produces excellent beer – but I am conscious of the fact that it takes up an awful lot of room.  At the moment that isn’t such an issue as it lives on its wheelable frame in the carport, but what if I were to move?  That would spell the end of my brewing.

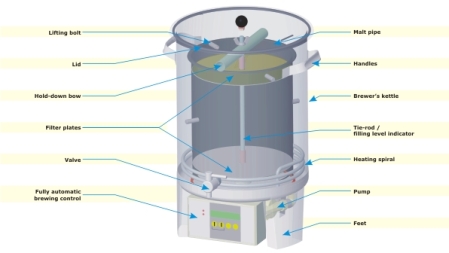
Then last weekend I went to check out an new piece of gear that a friend has just bought – a Braumeister.  This device is a single-vessel brewing system that is electrically heated and has a programmable control box which allows for a highly automated brewing experience.  It can be programmed to step the mash through 5 temperature points, alerts the brewer when various key stages are completed and keeps track of hop addition timings.  It produces 20L batches to a max OG of 1.057 and can quite happily brew indoors (for example on the kitchen counter!)

lowbrau - BM

This little beauty does come at a price though – $2500 (AUD).  Ouch.

So after seeing how it works I got thinking… The basic principle is that of a pot-in-pot design, where the inner pot (or malt pipe, as Speidel call it) is filled with grain.  The top of the inner pot is open and covered with a mesh and retainer.  The bottom of the inner pot is also open (hence tube) and covered by mesh but it seals to the bottom of the outer pot.  This allows a pump to suck wort from the outer pot and inject it to the bottom of the inner pot, pushing wort through the grain bed and letting it overflow out the top back into the outer pot.  In the gap between the outer and inner pot walls is a low density heating element and temperature probe.  And that’s basically it.  Once the mash is complete the malt pipe is raised to drain and removed then the heat is ramped up to commence the boil.

lowbrau - BM cutaway

None of this is particularly complex in either operation or construction.  And this makes me think that I could produce my own, low-cost homage to the Braumeister – the LowBrau!

Here are some of my design aims:

  • built using cheap, easy to source components
  • no welding required
  • same or greater capacity – both finished volume and OG
  • use arduino for control
  • facility for step mashes and general hands-off brew automation

What I don’t plan to do, however, is make a slavish clone of the Braumeister.  I want to make something out of the materials that I can source, that doesn’t require sophisticated or high tolerance machining and can provide the functionality/performance I require to suit my brewing style.  I think that the Braumeister is an excellent blueprint for not only what is possible but also what works for them – and as such will serve as an excellent point of reference when producing my system.